How to properly configure your emails in your Odoo
ERP
| LEVEL | Weak | Average | Strong |
|
Technical skills required
| X | ||
|
Business value
| X |
You are a business owner or your convince your company to use Odoo. Congratulations !
Now one of the first thing you would like to setup is for Odoo to use your email domain when sending emails to clients and providers. Additionally you also noticed those awesome Odoo aliases allowing to automate many things into Odoo...finally you were looking into Odoo setting and tried to setup an external email servers and realize it was not that easy.
Worry not, setting up emails properly in Odoo is one the questions Odoo support gets the most and it is easy to confuse the different email setup you're trying to achieve.
We will distinguish the 3 different Odoo email setups and their use cases. Please carefully note that those 3 setups are related and that if you made the first setup you are very likely to end upmaking the 2 other setups ( DISCLAIMER: if you don't feel technically confident, stop here and stick to Odoo default settings!):
- Setup @mydomain.com as email sender instead of the default @mydomain.odoo.com
- Use Odoo email aliases such as invoices@mydomain.com, sales@mydomaine.com, job@mydomain.com to automate actions into Odoo
Setup an external email server to avoid email sent by Odoo going into SPAM and eventually be able to send mass emailing campaign
STEP 1: Setup @mydomain.com as email sender instead of the default @mydomain.odoo.com
Use case: Email sent by Odoo to clients and providers arrive in email inboxes through @mydomain.odoo.com you would like those emails to look more professionals by using your own domain.
This first step is super easy ! As an admin just go into your Odoo Settings> General Settings> Discuss and in "custom email" enter your own domain.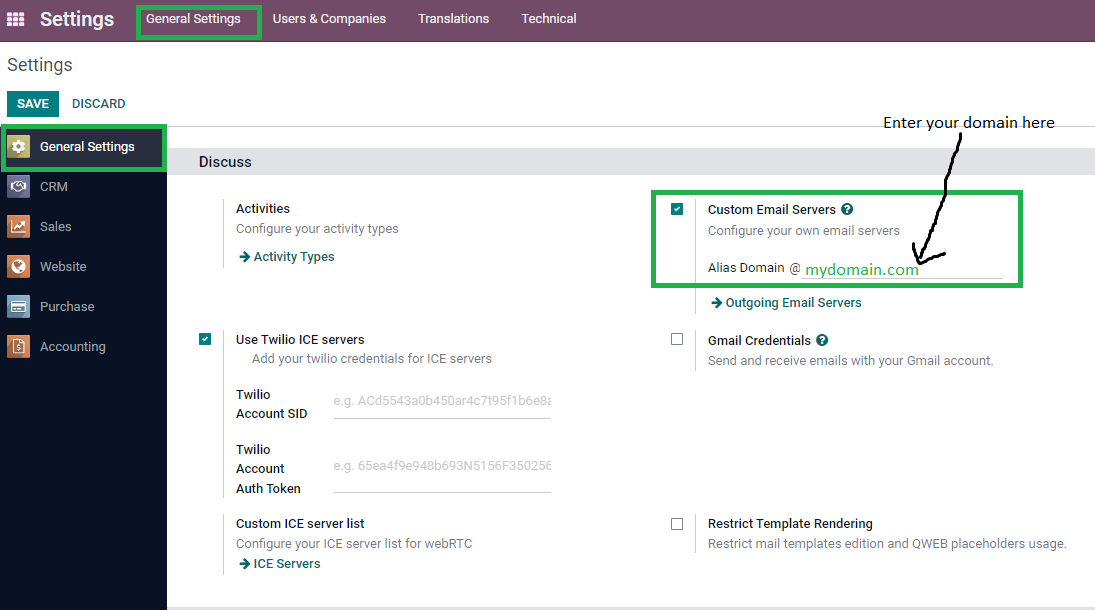
and voilà ...! You can test this setup and will realize the email you receive from your Odoo instance are now sent using your @mydomain.com. Tough chances are your emails arrive in a SPAM folder. To fix this see step 3 and/ or 2 and 3.
STEP 2: Use Odoo email aliases such as invoices@mydomain.com, sales@mydomaine.com, job@mydomain.com to automate actions into Odoo
Use case: you would like to use Odoo aliases with your domain name for example you would like to process invoices in your accounting app by sending emails to invoices@mydomain.com instead of invoices@mydomain.odoo.com. This could also be the case with job applications sent at job@mydomain.com instead of job@mydomain.odoo.com... Additionally you don't want to create an alias or a new email on your email tenant (Outlook, Exchange, Gmail, etc) every time you want to use a new Odoo alias.
This step is probably the most complicated one so fasten your seatbelt! Rest assured no coding is needed, you'll be able to accomplish this miracle only with a mouse. Let's go !
The concept is as followed only two things to achieve this
- Firstly, create a "catchall" email address that will receive all incoming emails not existing in your email tenant ( (Outlook, Exchange, Gmail, etc). In other words:
- you want to tell your email tenant that if you receive an email to @mydomain.com; in the case email address does not exist this should arrive to catchall@mydomain.com
-
In the case of Odoo aliases; when a user sends an email to an email that does not exists in your domain such as OdooAlias[invoices, jobs, sales, etc]@mydomain.com this will arrive in catchall@mydomain.com
- Secondly, you want this catchall@mydomain.com to redirect all email to catchall@mydomain.odoo.com
- Thirdly as soon as Odoo receives an email destinated to an Odoo alias into catchall@mydomain.odoo.com, Odoo will know exactly how this email should be assigned -> this is where the magic happens but you do not have to do anything nor do you need to understand it for a successful setup. Lot of people get lost into the email setup because they try to do Odoo's job.
Create a catchall@mydomain.com for all incoming emails sent to unknown addresses on your domain
I hope you will be able to pick up how to do this based on my explanations if not please do follow a tutorial based on the information you have or here for Outlook. Below I am explaining how to create a catchall email for Gmail (Business account now called Google WorkSpace) which is one of the major business email providers used by SME's.
Connect to your Gmail account using the admin user, click on admin console (right hand corner ->settings-> Admin console: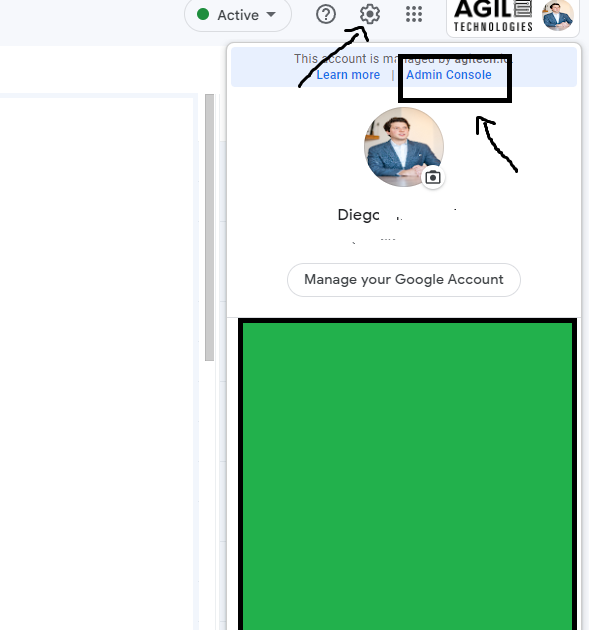
Go to user, and create a new user with the email "catchall@mydomain.com" (this is an easy process into which I will not walk you through).
In the admin console, open the Gmail parameters and find the "Routing" tab: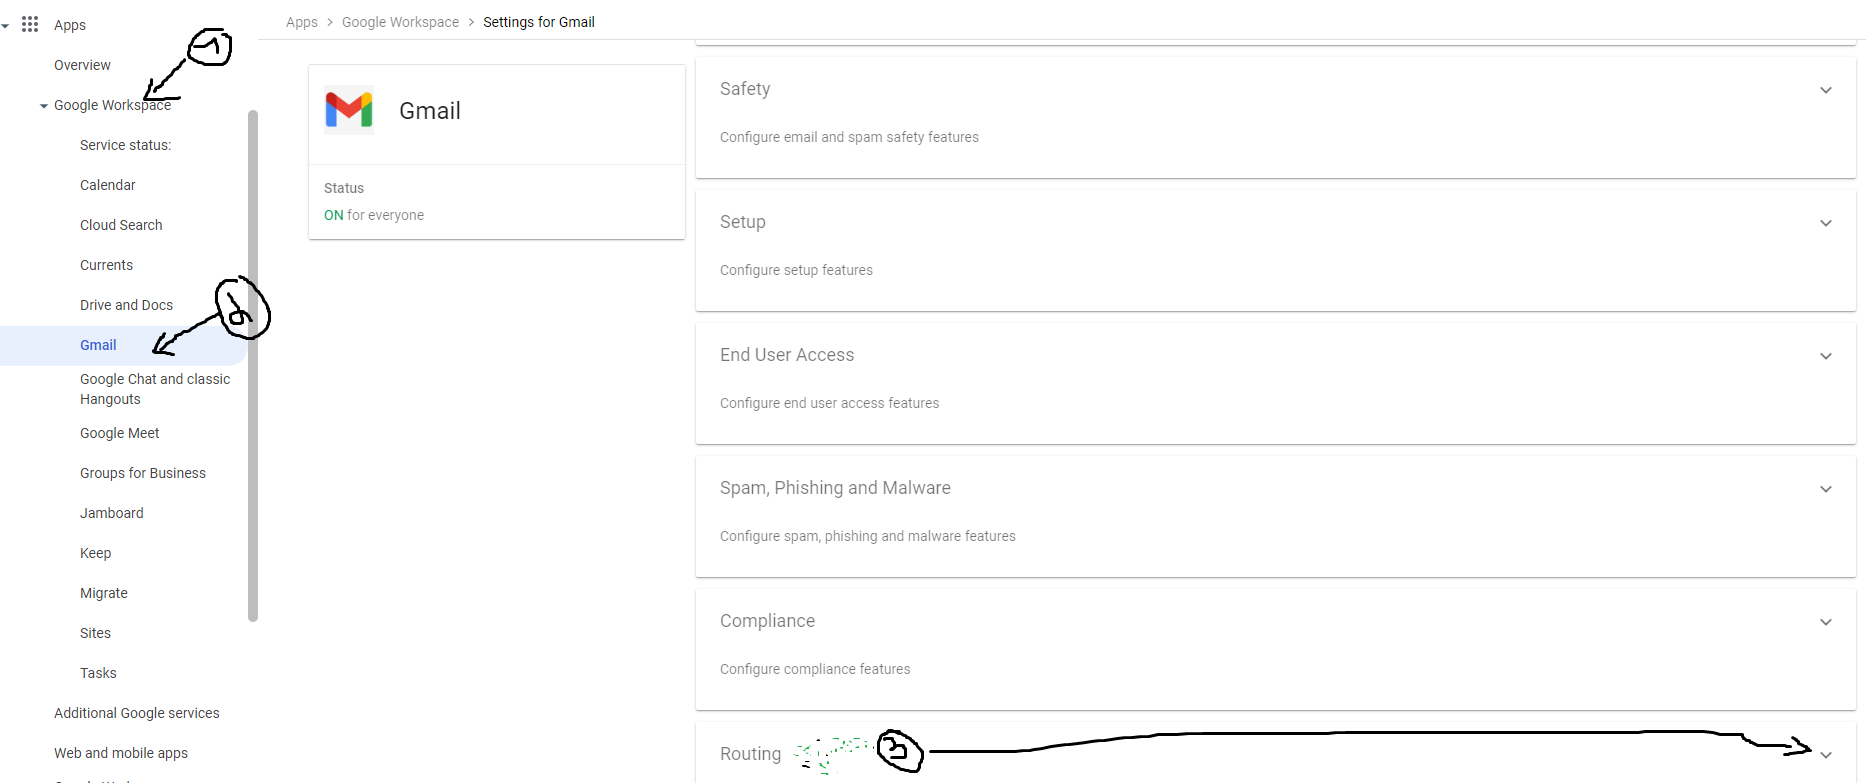
In the routing tab on the top "Routing" you'll create your catchall@mydomain.com email by clicking on creating a new rule.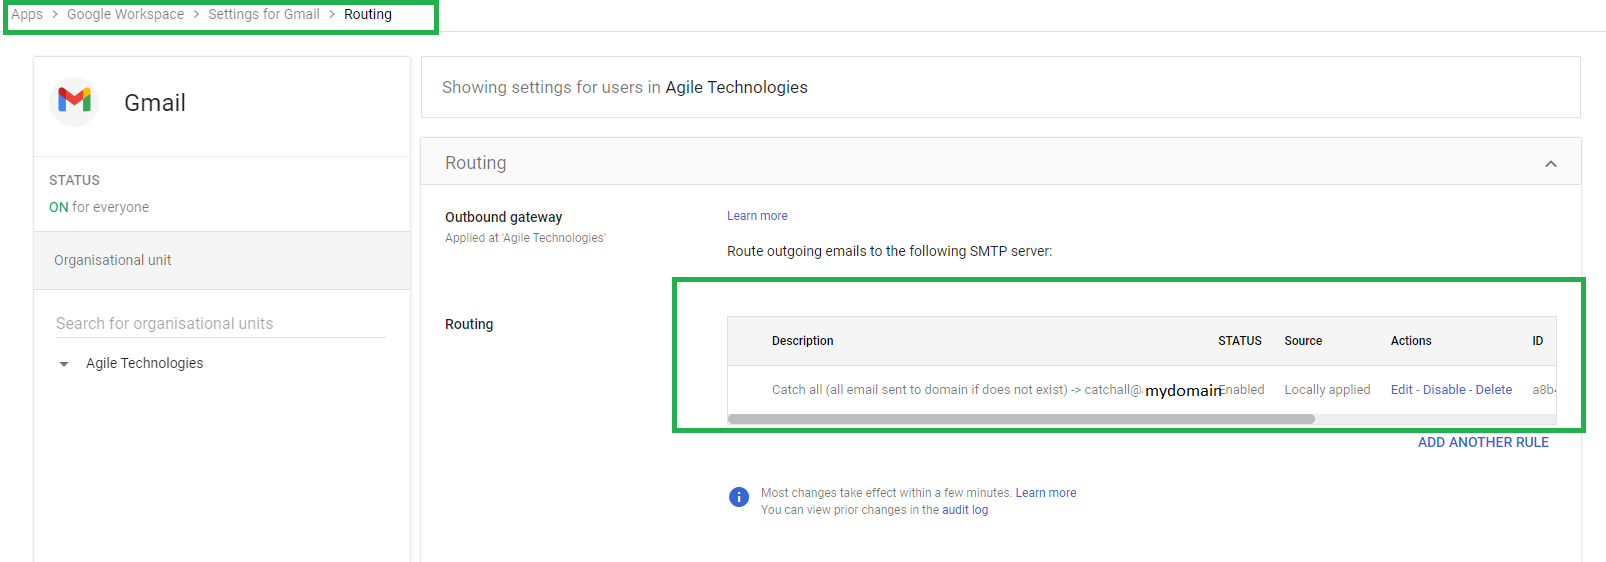
Pay attention to the following parameters that you will need to include into your configuration:
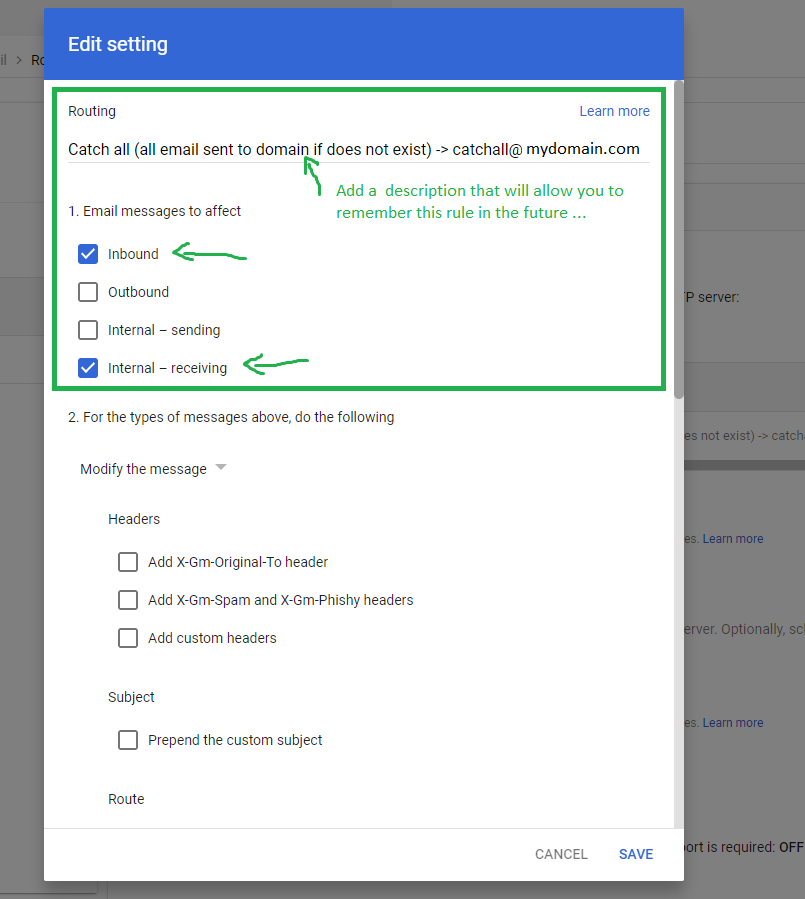
Scroll down until you make sure you have added all the right parameters.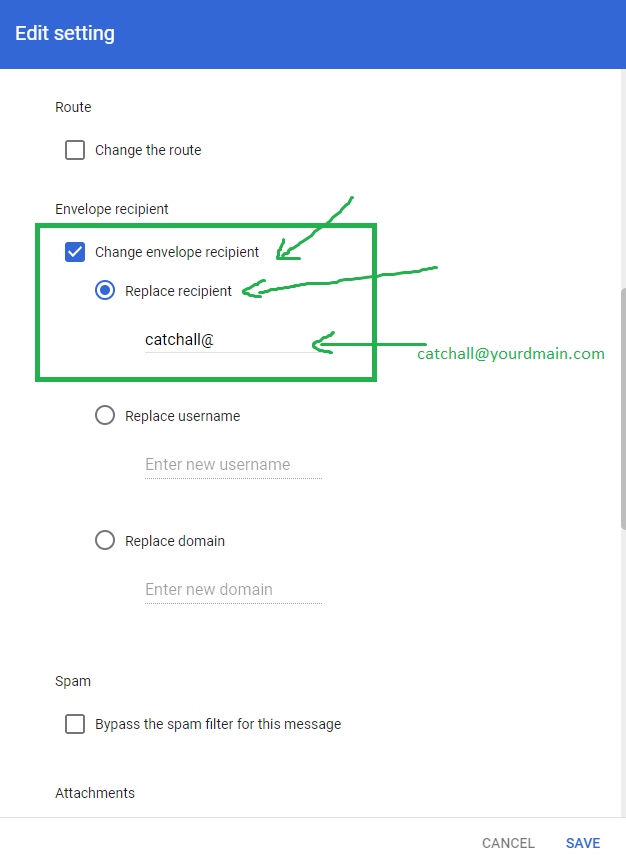
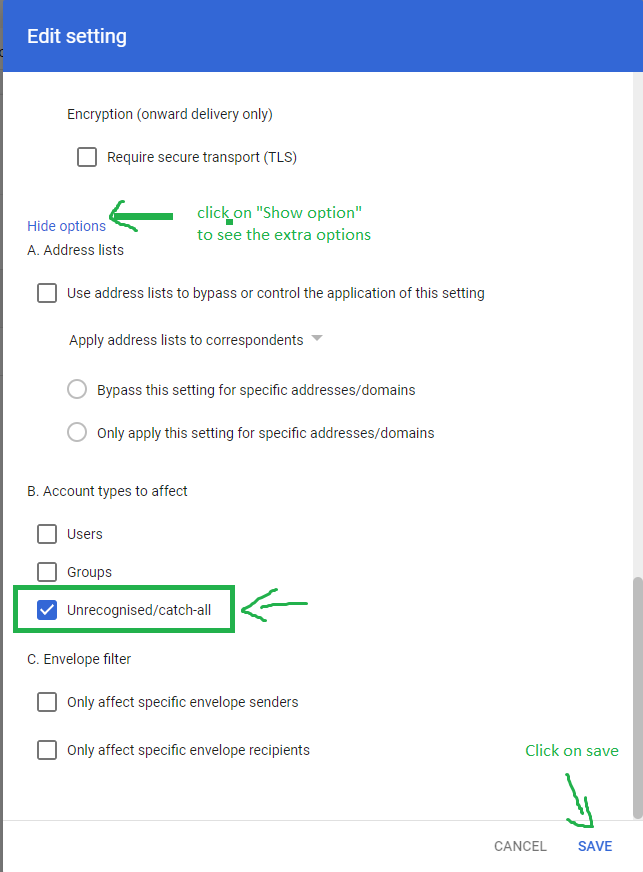
Now every time an email is not recognized by your email server, it will land in your catchall@mydomain.com mailbox. We're nearly there, hold on !
Redirect all incoming emails from catchall@mydomain.com to
catchall@mydomain.odoo.com
Go to your settings using you admin user on Gmail. Then go to the admin console and select Gmail>Routing like we have selected above.
Scroll to the bottom and stop at "Email forwarding using recipient address" (do NOT get confuse with "Routing" above! It's another config in another place :), create a new rule:
Now add the following parameters: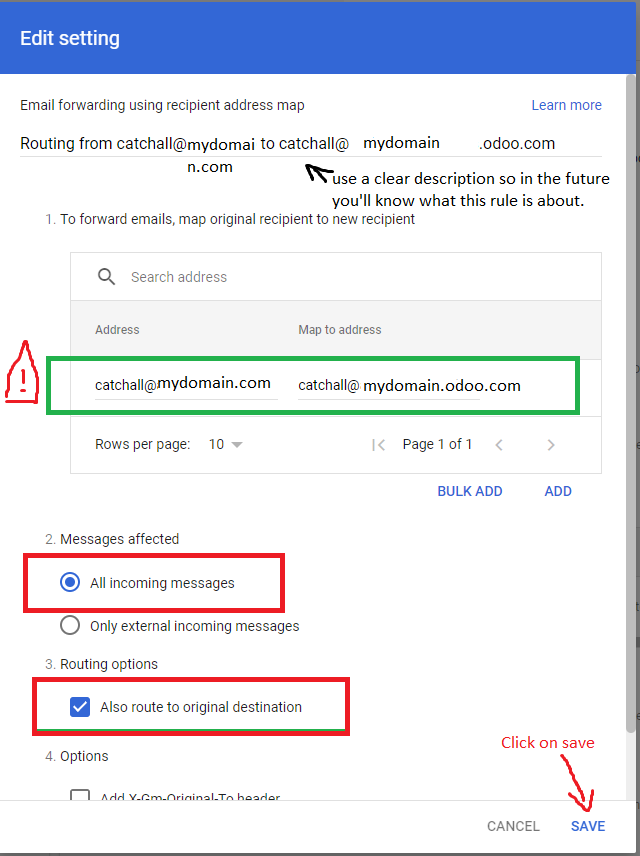
Your Odoo aliases using your own domain are ready! You can create as many aliases that you want for accounting, recruitment, expenses, projects, CRM there is no need to do everything else it is all set.
When sending an email to an alias -> the email will arrive into your catchall@mydomain.com mailbox. The email will then be forwarded to catchall@mydomain.odoo.com and Odoo will know exactly how to treat the email should it be for accounting, HR, CRM, projects etc ! Kudos to you !
STEP 3: Setup an external email server to avoid Odoo outbound emails to land into SPAM and eventually be able to send mass mailing campaign.
The are two main business objective of using your own email server instead of Odoo default one:
Use case 1: You need to use an email that verified you domain to avoid email arriving in the SPAM of your clients and
Use case 2: if you use Odoo for emailing marketing you may need to have an email server that can sustain the weight of sending thousand emails daily (which is not the case of your traditional Outlook or Gmail server).
Here is what you need to do step by step to setup a external email server:
- Sign-up to an email server provider (in this case we have chosen a market leader "Mailgun" that has a freeplan)
- Confirm your domain with this Email server provider (you will therefore need an access to your domain name DNS records).
- Configure your new email server into Odoo
On Mailgun.com create a new account. After your sign in process, go into Sending>Domain> Add a new domain.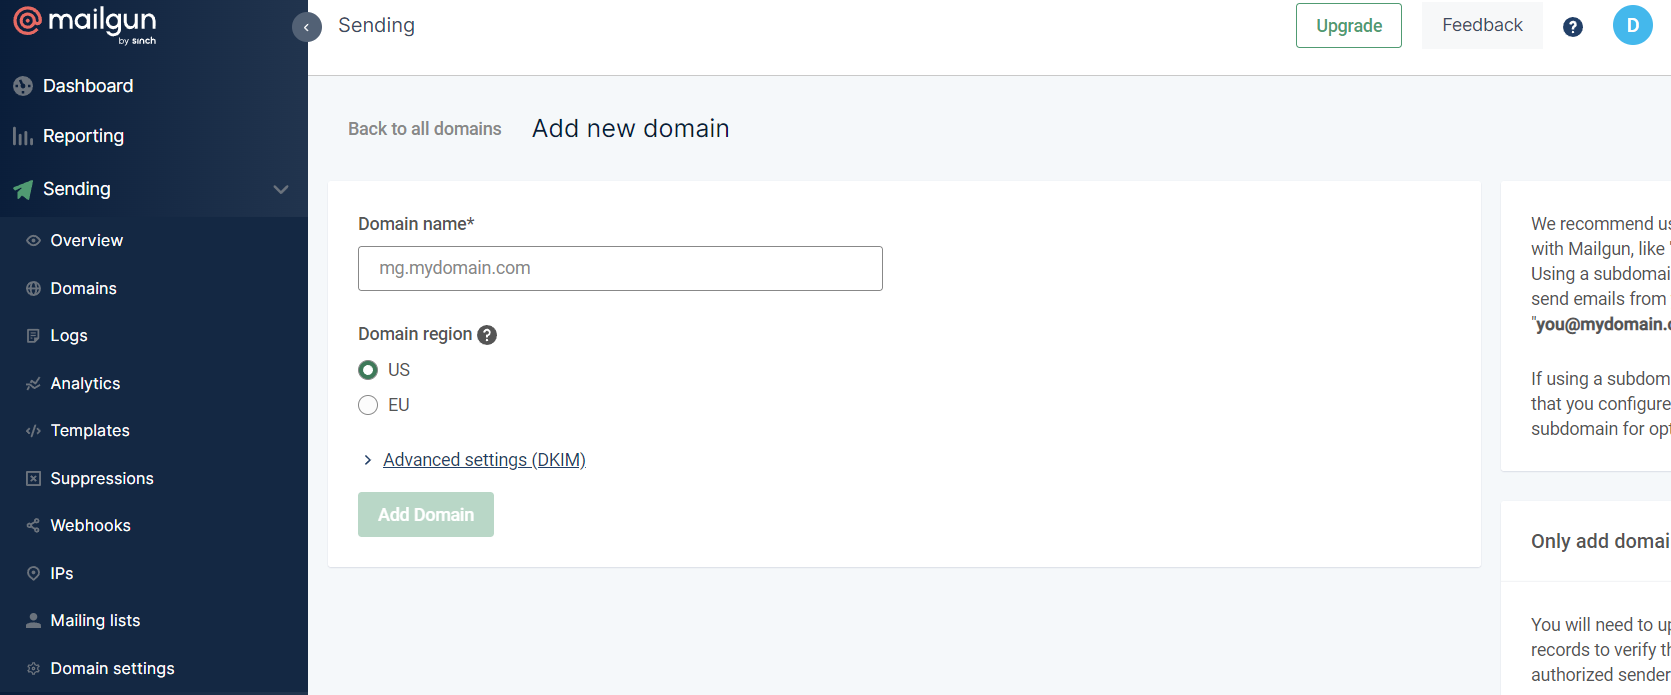
As soon as you created a new domain, Mailgun will invite you to confirm your domain by creating new DNS record in your domain name settings.
You can retrieve this setup at anytime by clicking on Sending> Domain>Select the domain then Domain setting on the bottom and finally by clicking on DNS Records.
Go into your domain settings on your domain name provider. And verify your domain by creating the two first Mailgun DNS records (TXT type record)/ hostname and value.
Update Mailgun page after 3-4 minutes your domain should be verified by Mailgun ! Congrats you can now use this brand new email server. Go into the SMTP credentials and carefully take note of the credentials of your brand new Mailgun email server. The first time you display the SMTP credentials the password will not show, therefore click on reset password; Mail will generate a new password that you can copy (See n°2).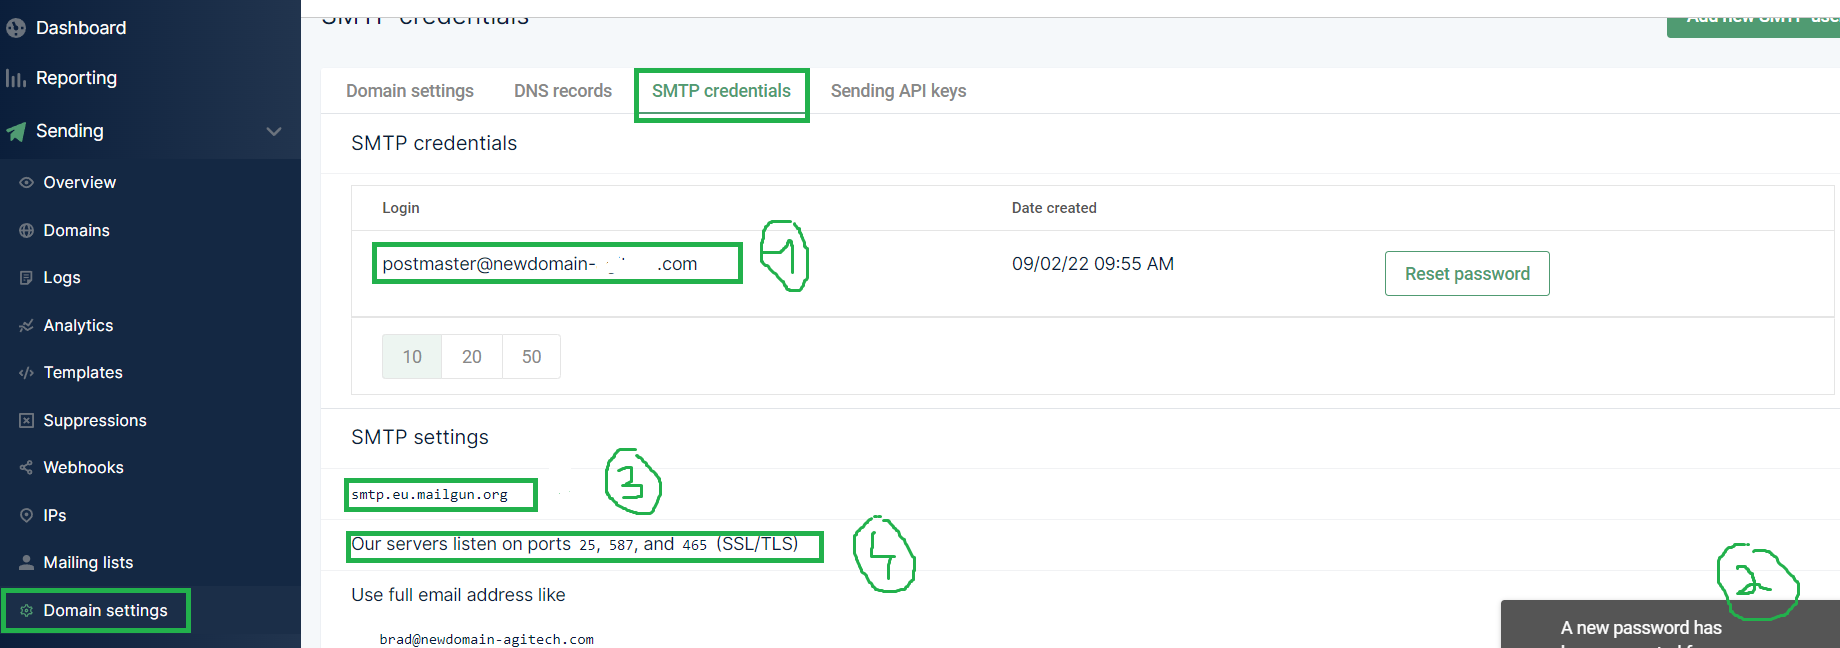
Finally, we need to tell Odoo to use this email server when sending emails.
Go into your Odoo database in Settings>General settings> Discuss> Outgoing email server.
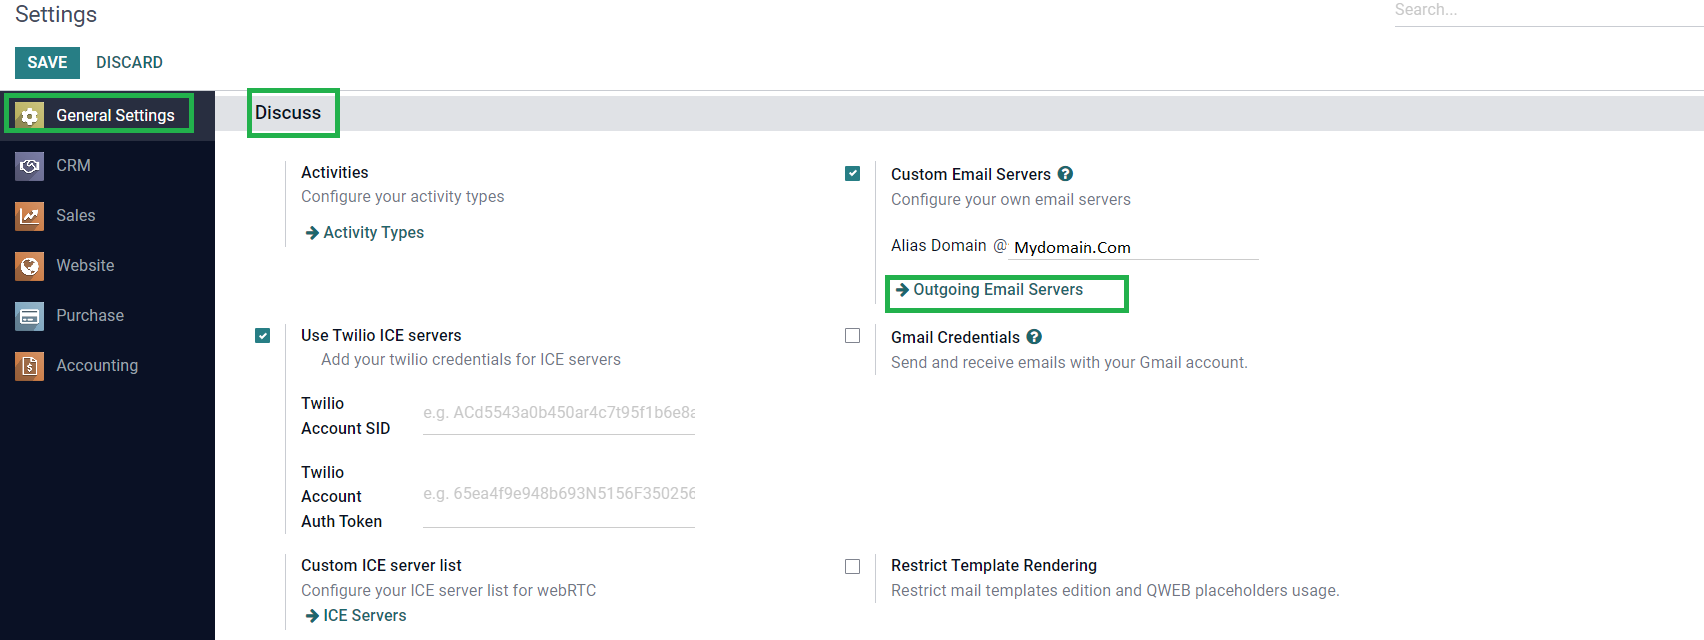
- Create a new server and use the Mailgun SMTP credentials.

To finish the setup, click on test connection, Odoo should prompt a message that the test is successful ! Click on save - you are now all set -
Congratulations! It was quite a ride but you can now: - send email from your Odoo database using your own domain
- sending large quantities of email for marketing
- sending email and avoiding them to go to SPAM folders
- Using as many Odoo aliases that you'd like
- Using common inbound Odoo email features (chatter, etc)
Do not hesitate to contact us should you need further assitance or if you have any questions ! :)